Overview
With Entri Sell, your users can buy and connect a domain name to your application effortlessly, right within the Entri modal. After purchase, Entri automatically connects their domain to your service, applying the records you define on thednsRecords object.
1. Integration Guide
2. Sell Registrars
3. Frequently Asked Questions
Integration Guide
Step 1: Configure Entri
To set up Sell, first configure Entri Be sure to use dynamic configuration variables if your DNS records change based on the domain purchased.Step 2: Select your Sell registrar partner
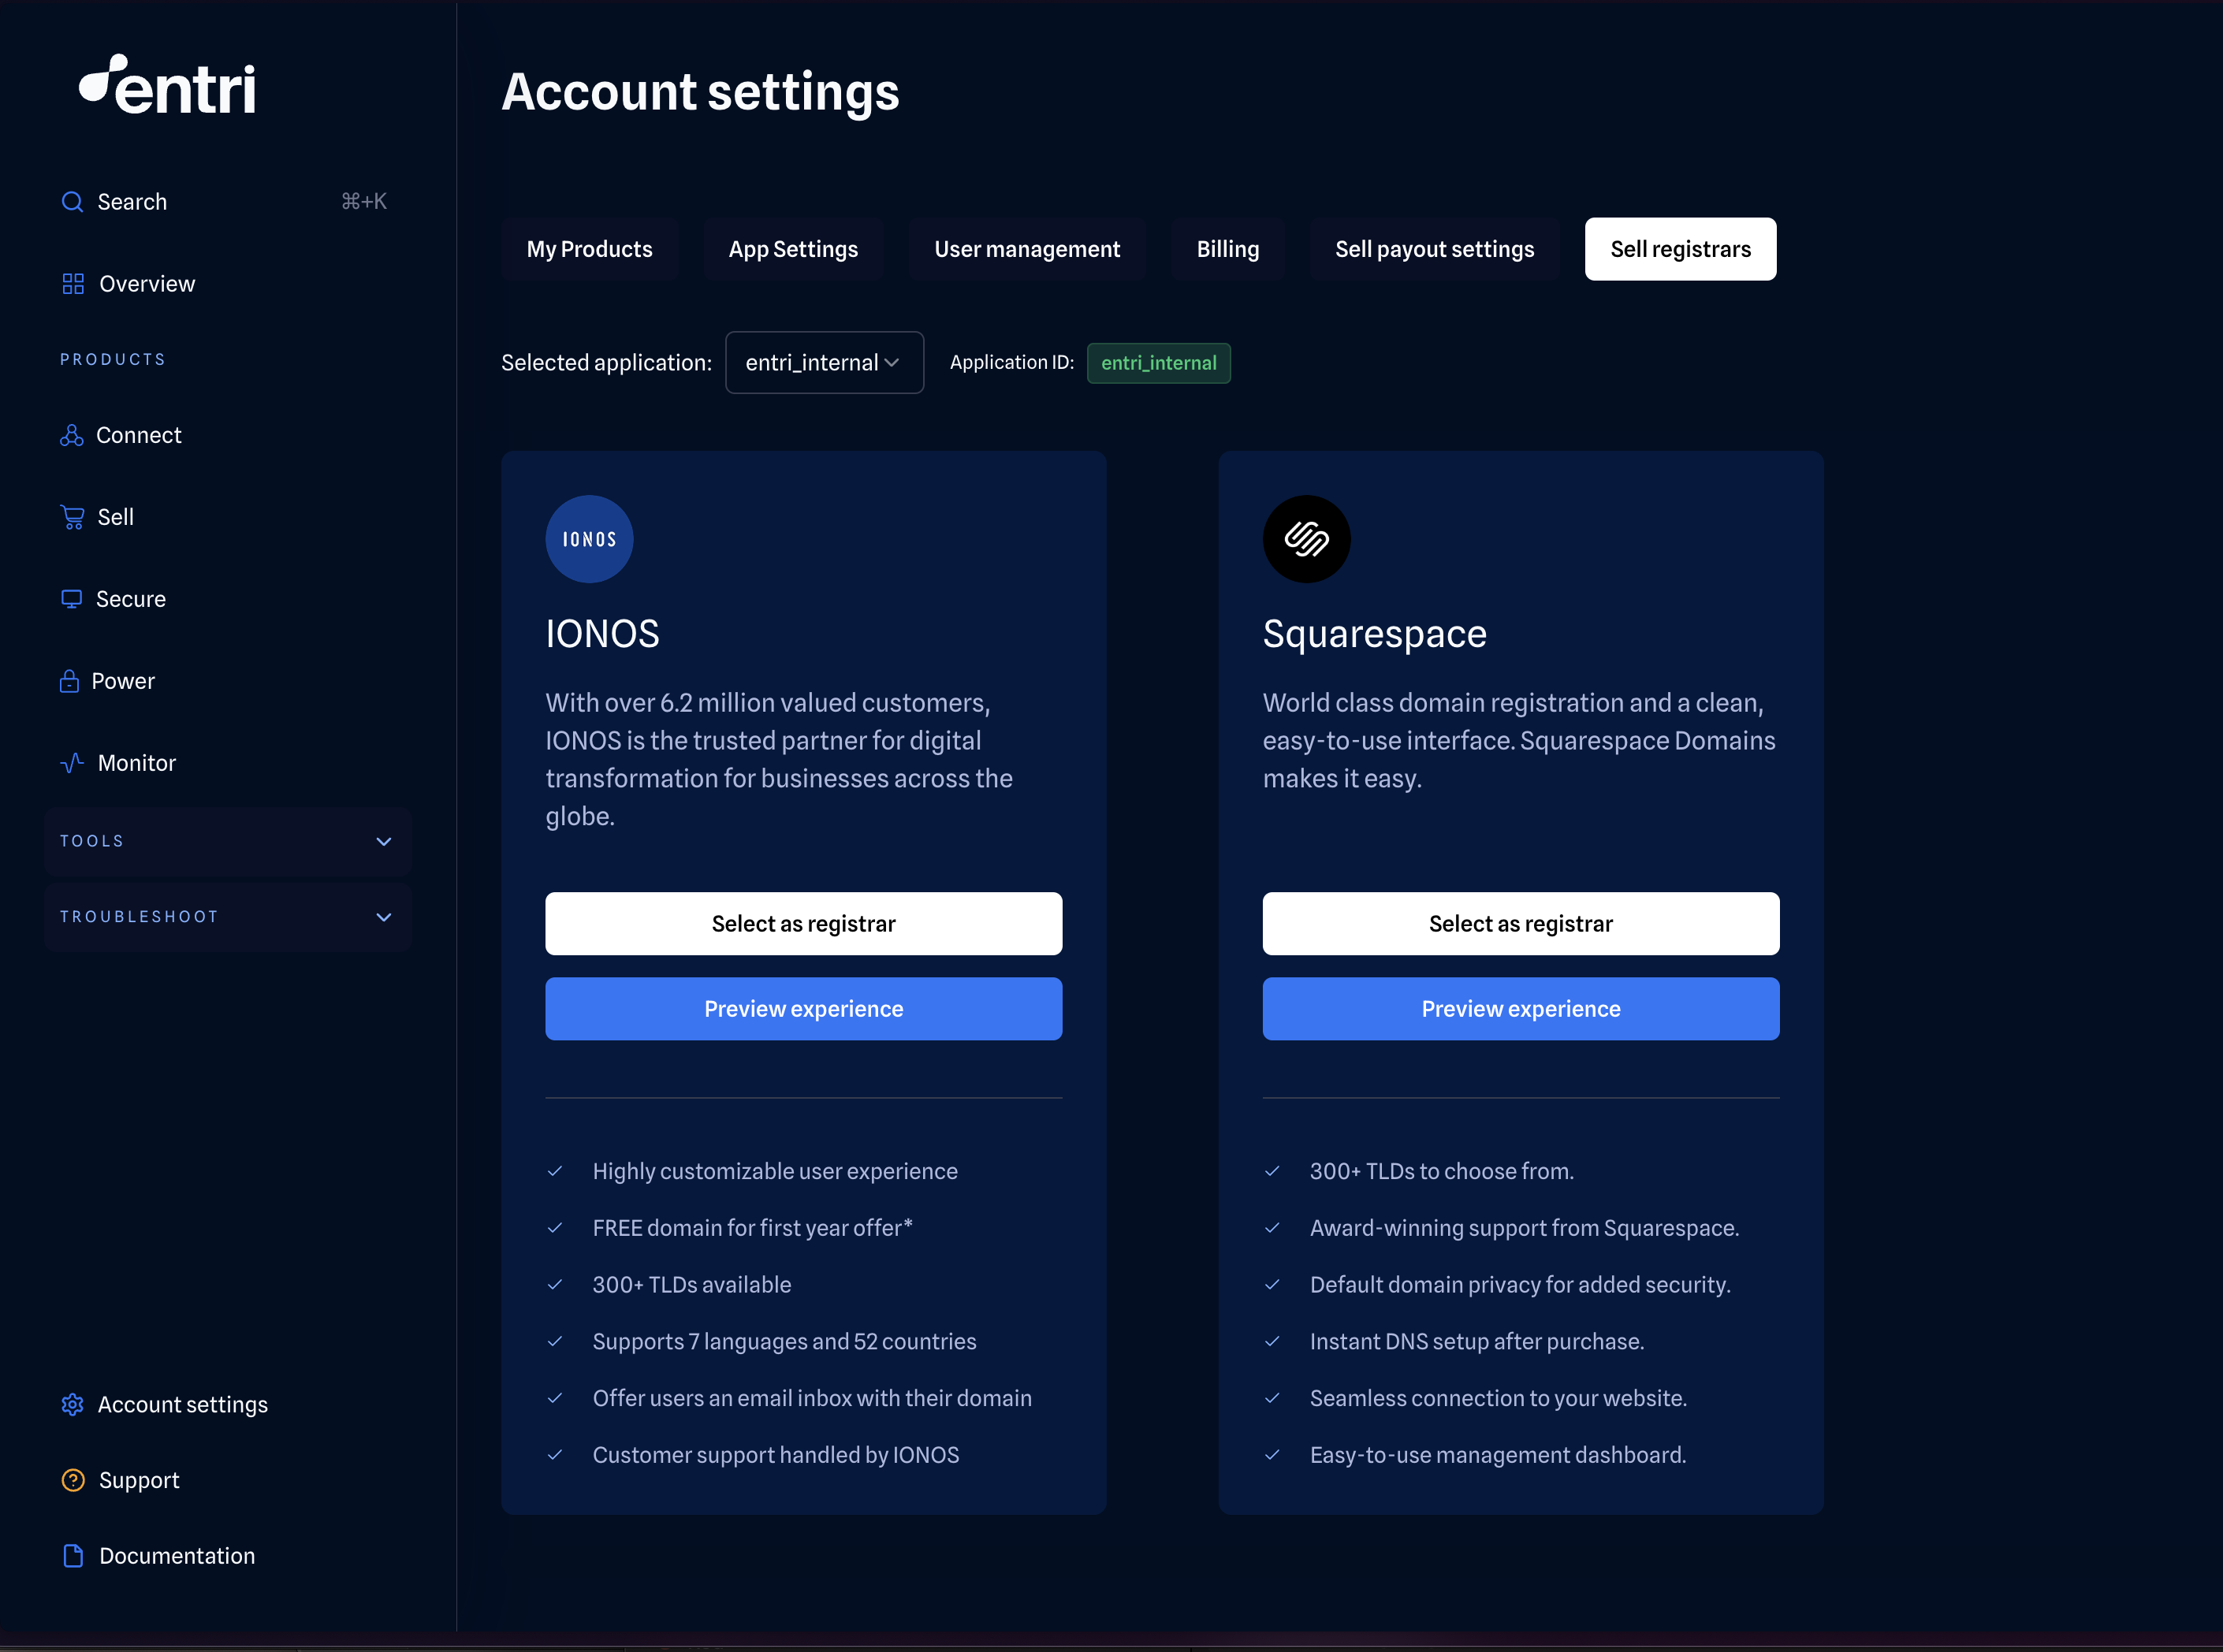
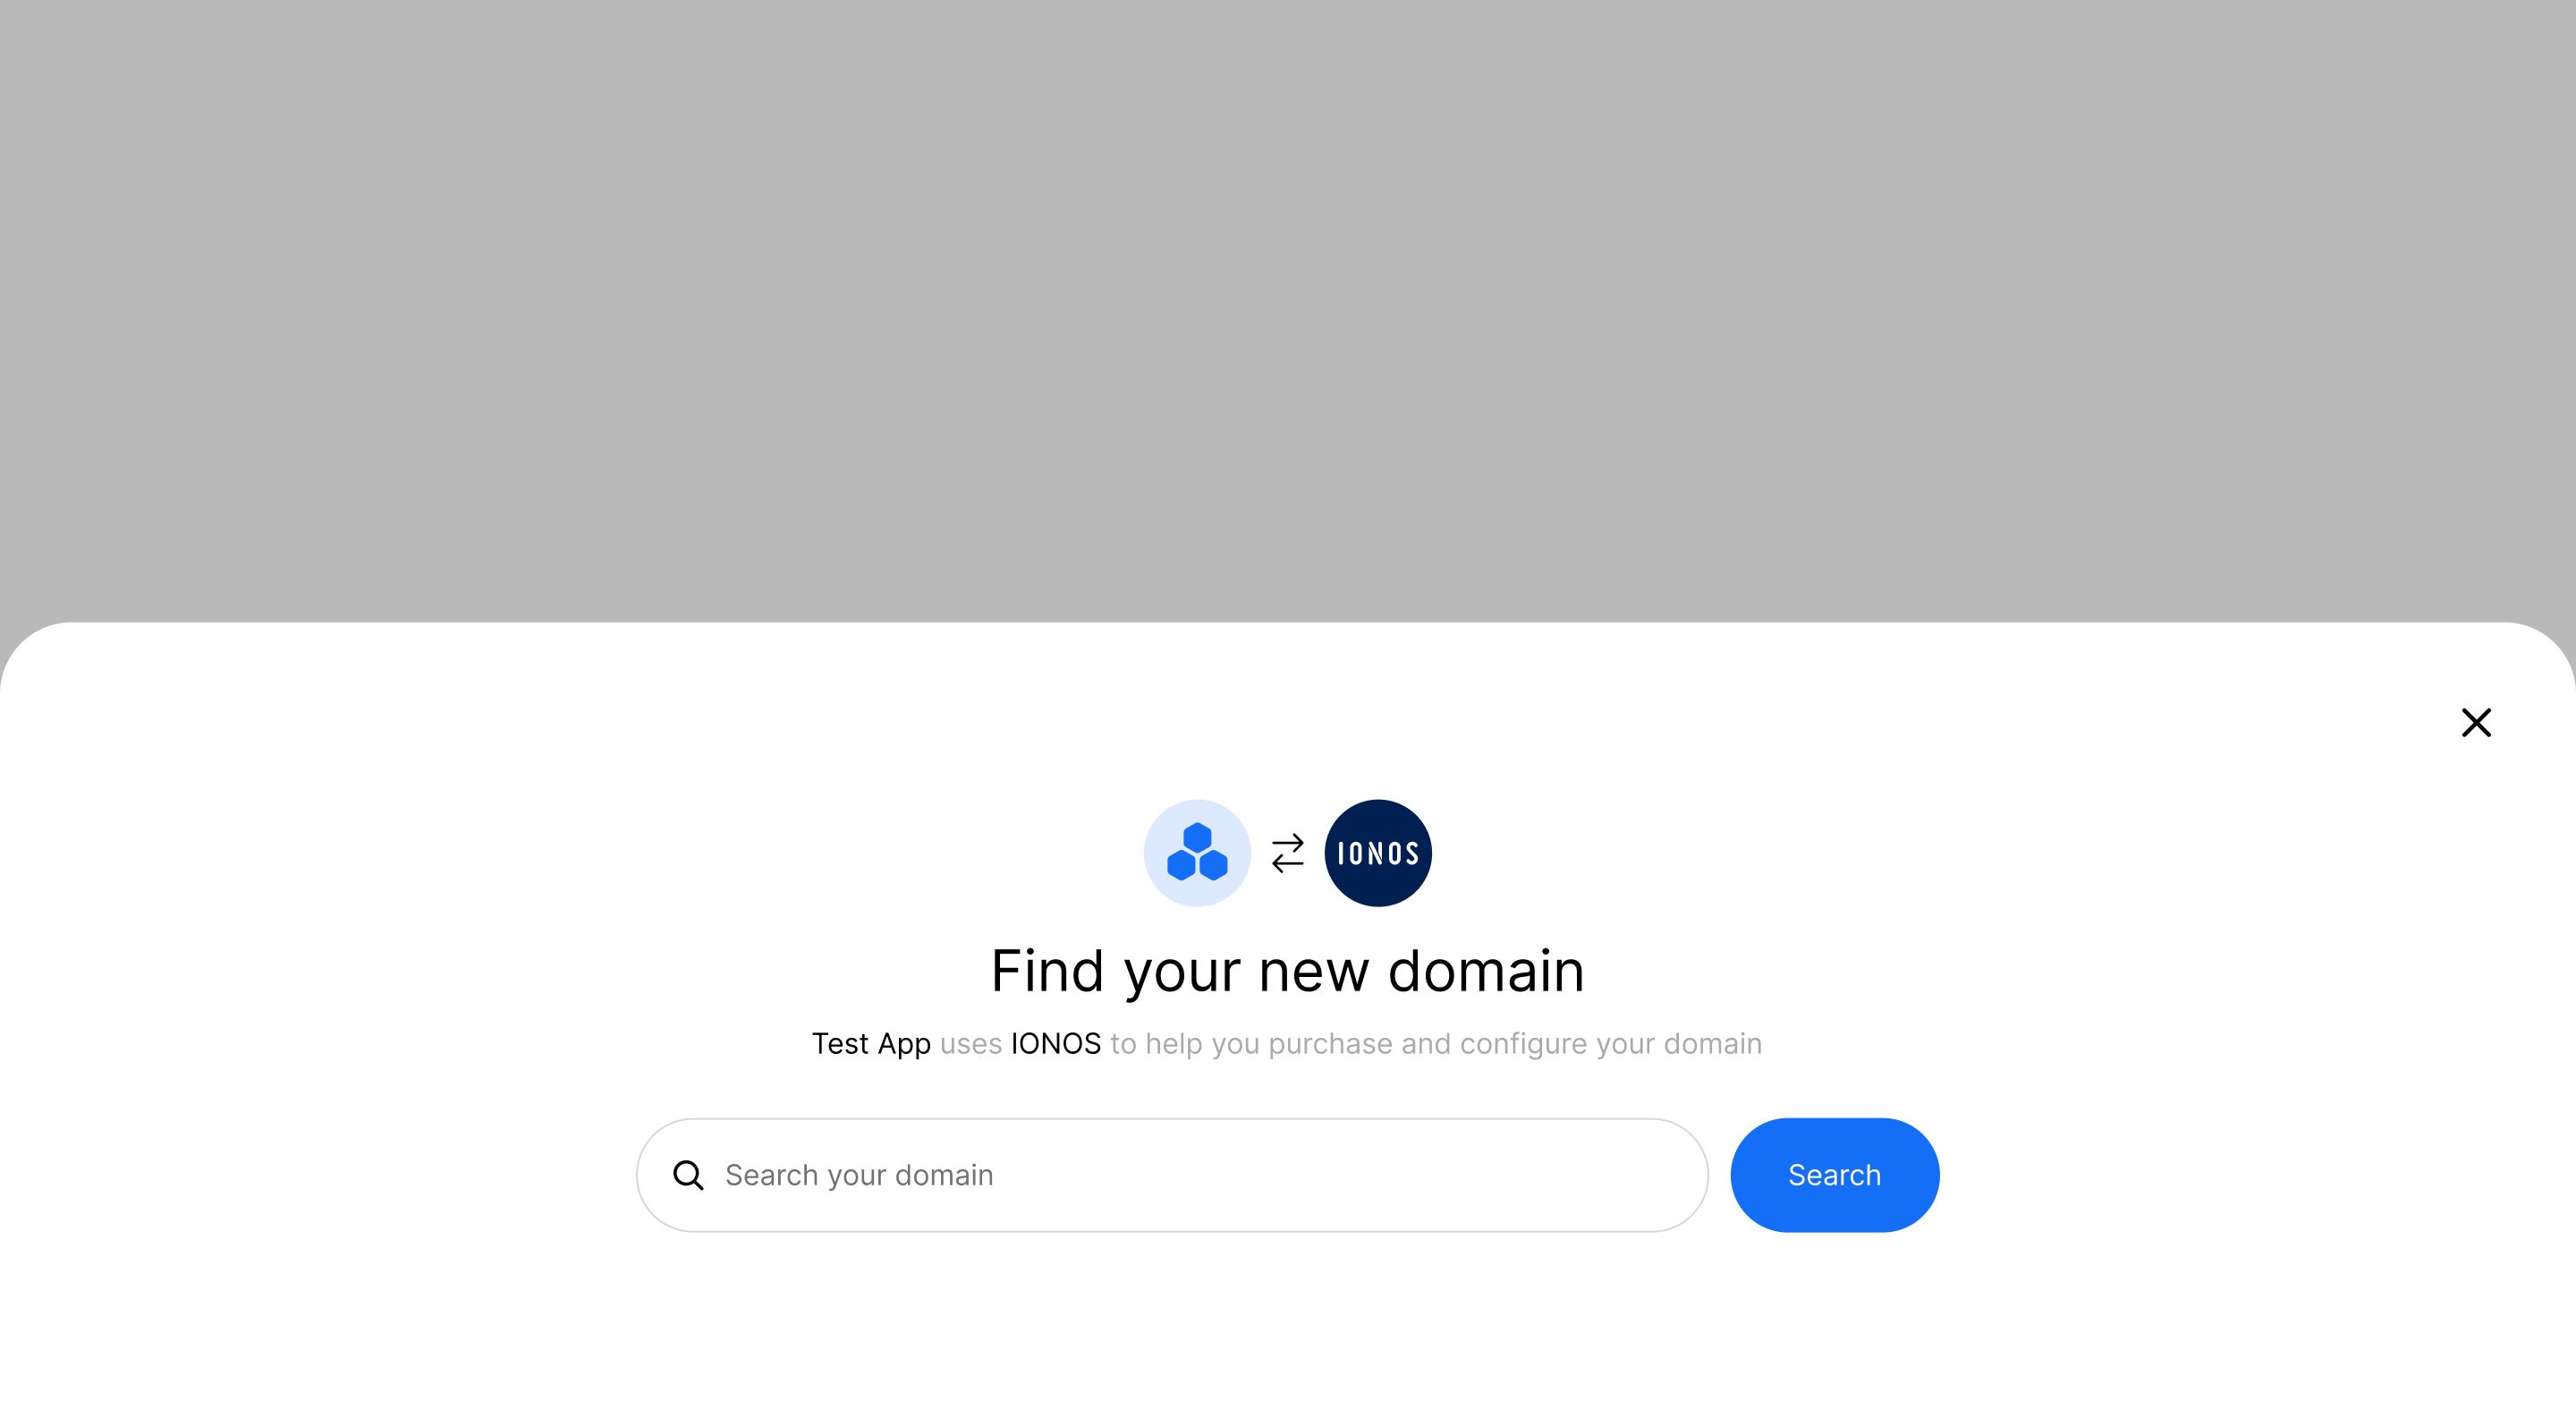
To start selling domains, you’ll need to select your Sell registrar partner. By default, no partner is selected in your account. Each partner will provide a different checkout experience, and a different set of functionality (top level domains, languages, regional support etc.). To learn more about each partner, please visit the Sell Registrars page or the Entri dashboard. After logging into the Entri Dashboard, visit the Account Settings page and the Sell Registrars tab. On this tab you can preview each Sell experience, learn more about the functionality offered by each partner, and select your registrar for each of yourApplicationIDs.
Step 3: Define your return URLs (optional)
By default, Entri Sell redirects the user back to your platform if they complete or exit the purchase flow, on the same page that they were referred from. But, if you’d like to specify a different return URL, you can define this:successCallbackUrl: The URL to which the user will be redirected after a successful domain purchase.exitCallbackUrl: The URL to which the user will be redirected if they select Close (X) before completing the purchase flow.
Step 4: Call purchaseDomain()
Call thepurchaseDomain method with your configuration object to open the Entri Purchase Domain Flow.
Configuration object specifications
More information about the properties within the object that you’ll pass to theentri.purchaseDomain method.
Basic Configuration
applicationId(string): A unique identifier for your application, available in the Entri dashboard. Example:"12345"token(string): A JWT token used for authentication and authorization. Example:"JWT_TOKEN"sellVersion(string) (only for IONOS): This only applies to customers using IONOS as their Sell Registrar. This specifies the version of the IONOS domain purchase flow that should be shown. Setting this to"v3"will activate the latest version with enhanced features. Example:"v3"successCallbackUrl(string) (optional): The URL to which the user will be redirected after a successful domain purchase. The purchased domain will be added as adomainquery string parameter to the success callback URL. Example:"https://myapplication.com/success"(redirects tohttps://myapplication.com/success?domain=mydomain.com)exitCallbackUrl(string) (optional): The URL to which the user will be redirected if they select Close (X) before completing the purchase flow. Example:"https://myapplication.com/exit"
DNS Records
dnsRecords(array of objects): An array containing DNS record objects. These records will applied after a successful domain purchase.- Example:
Webhook Notifications
When your users go through the Sell flow, Entri will send you webhook notifications to update you on their progress and the status of their purchase. To learn more about the configuration and webhook notifications, please visit our webhook documentation page.Sell Registrars
Entri currently partners with IONOS and Squarespace as our Sell registrars. You have the ability to choose between these partners to determine your checkout experience and functionality that you will have available. If you are a customer and have any questions on Sell registrars, please reach out to your Account Manager. If you are a registrar or reseller who is interested in partnering with Entri, please reach out to us at partnerships@entri.com.IONOS
With over 6.2 million valued customers, IONOS is the trusted partner for digital transformation for businesses across the globe.- Highly customizable user experience
- FREE domain for first year offer (only for paid users)
- 300+ TLDs available
- Supports 7 languages and 52 countries
- Offer users an email inbox with their domain
- Customer support handled by IONOS
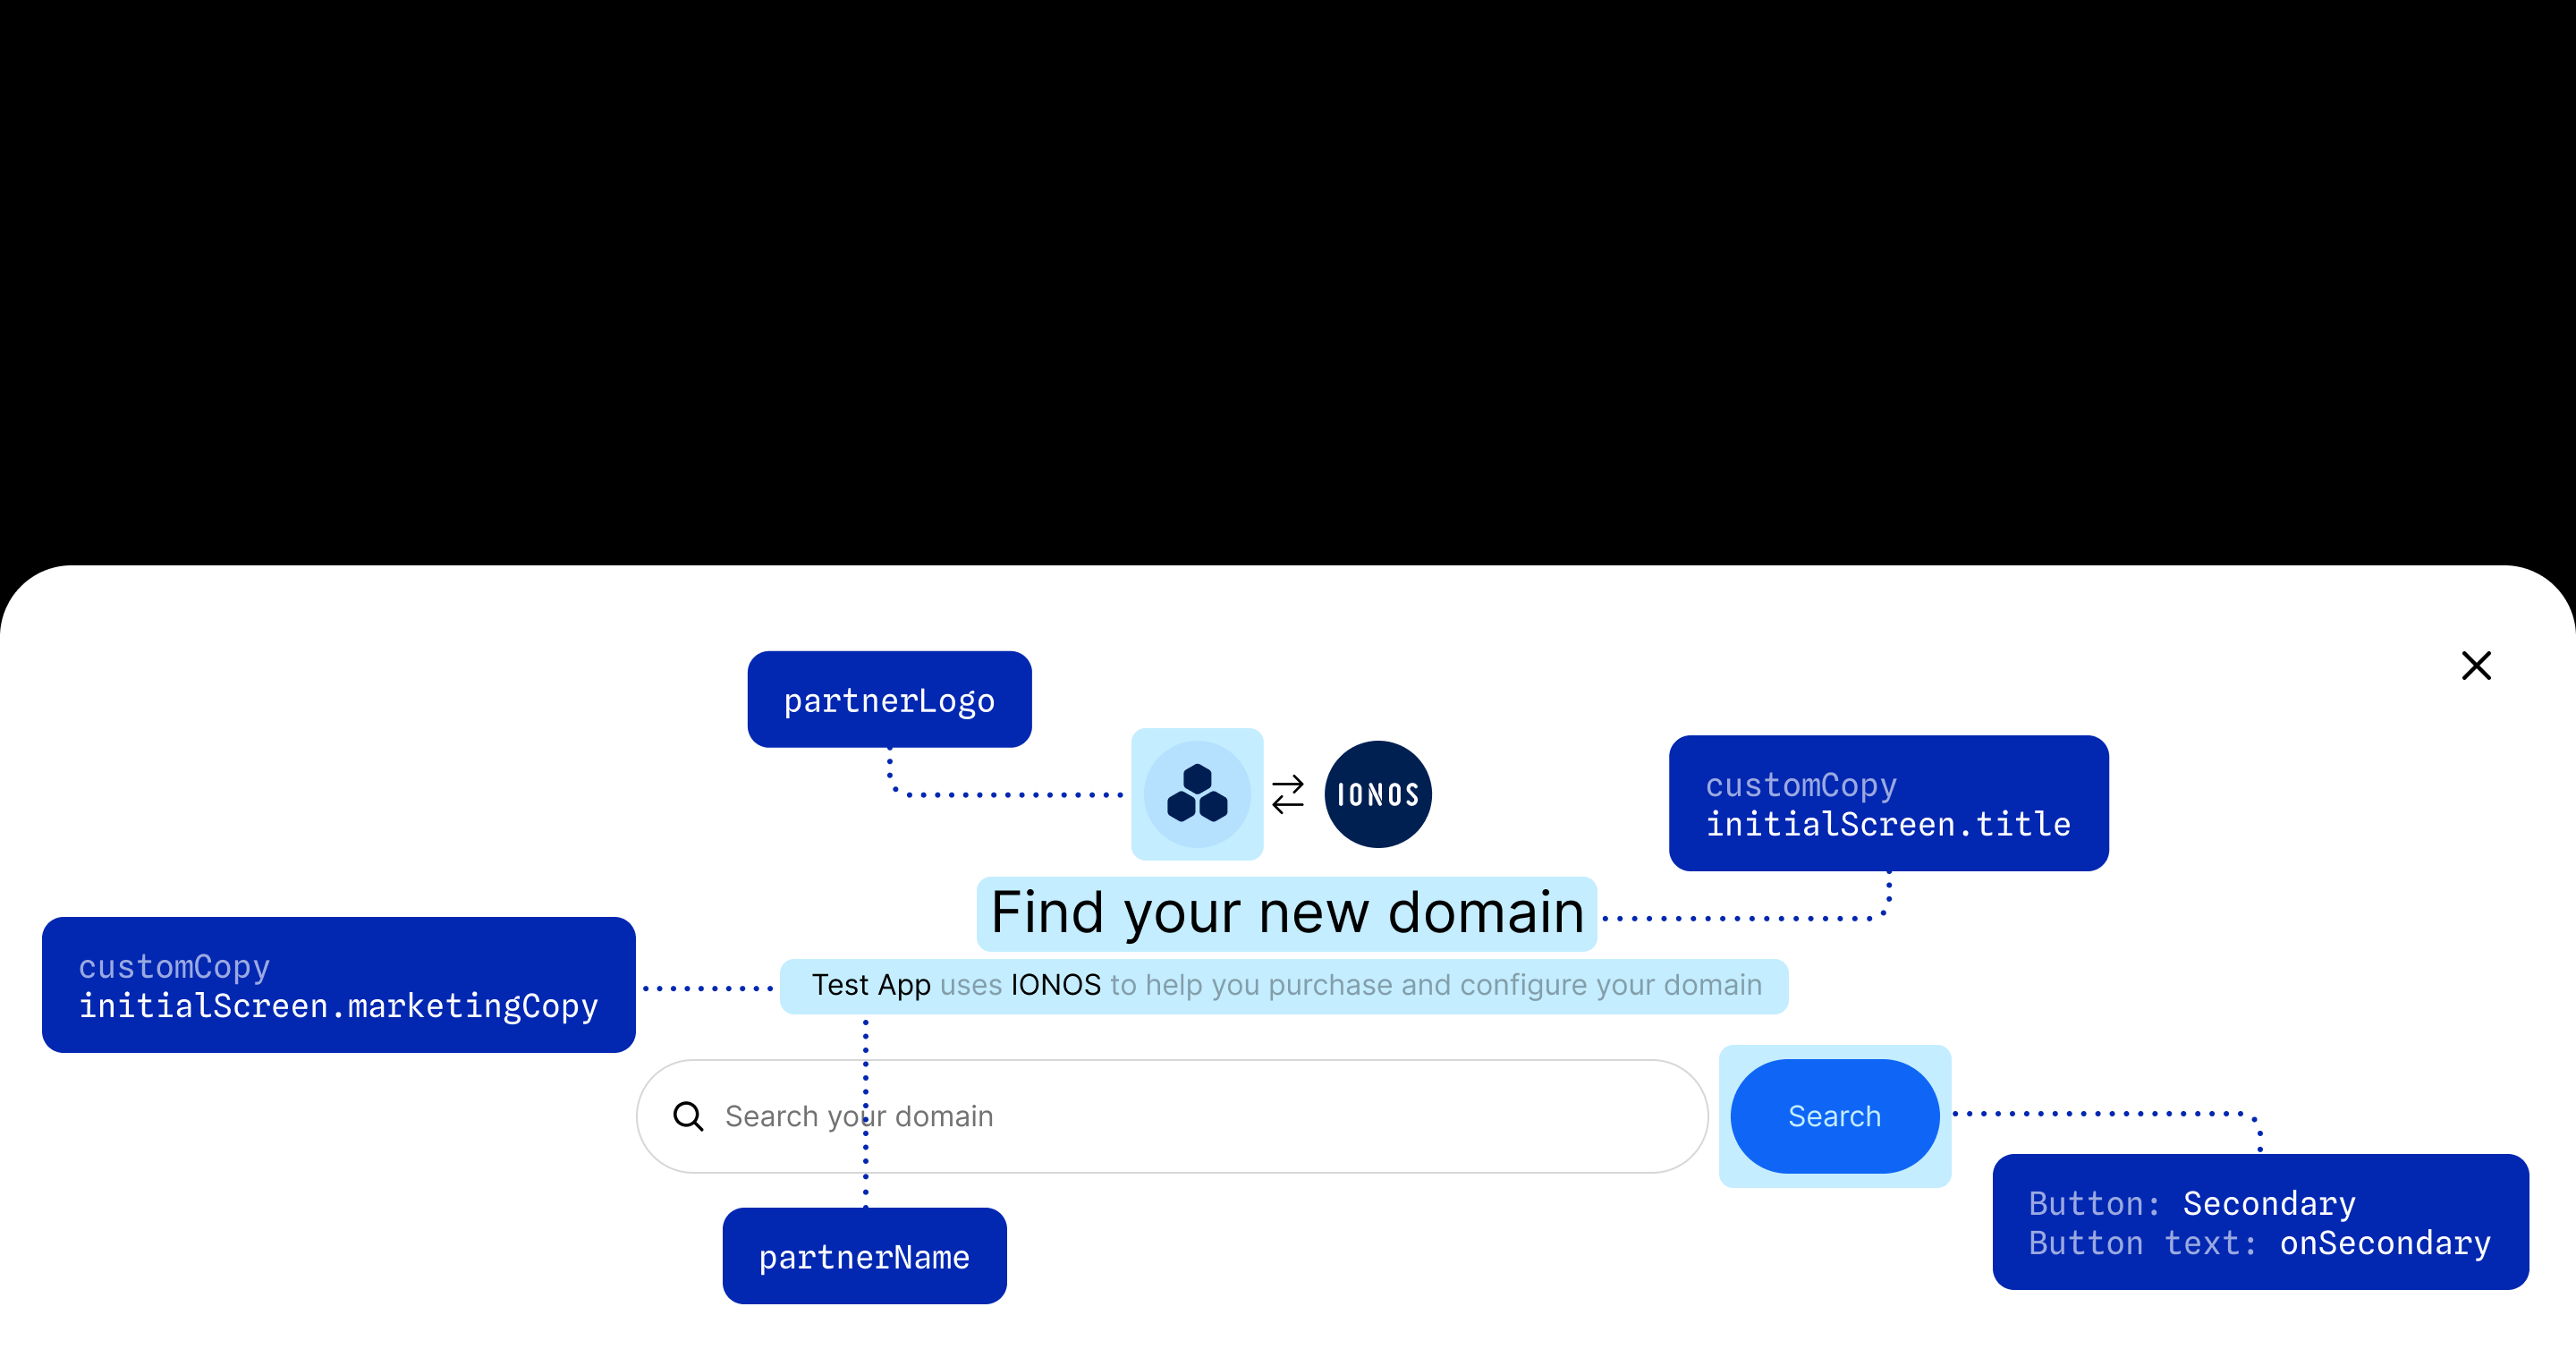
Whitelabeling/Branding
whiteLabel
(object): Options for customizing the appearance of the domain purchase flow to match your brand.
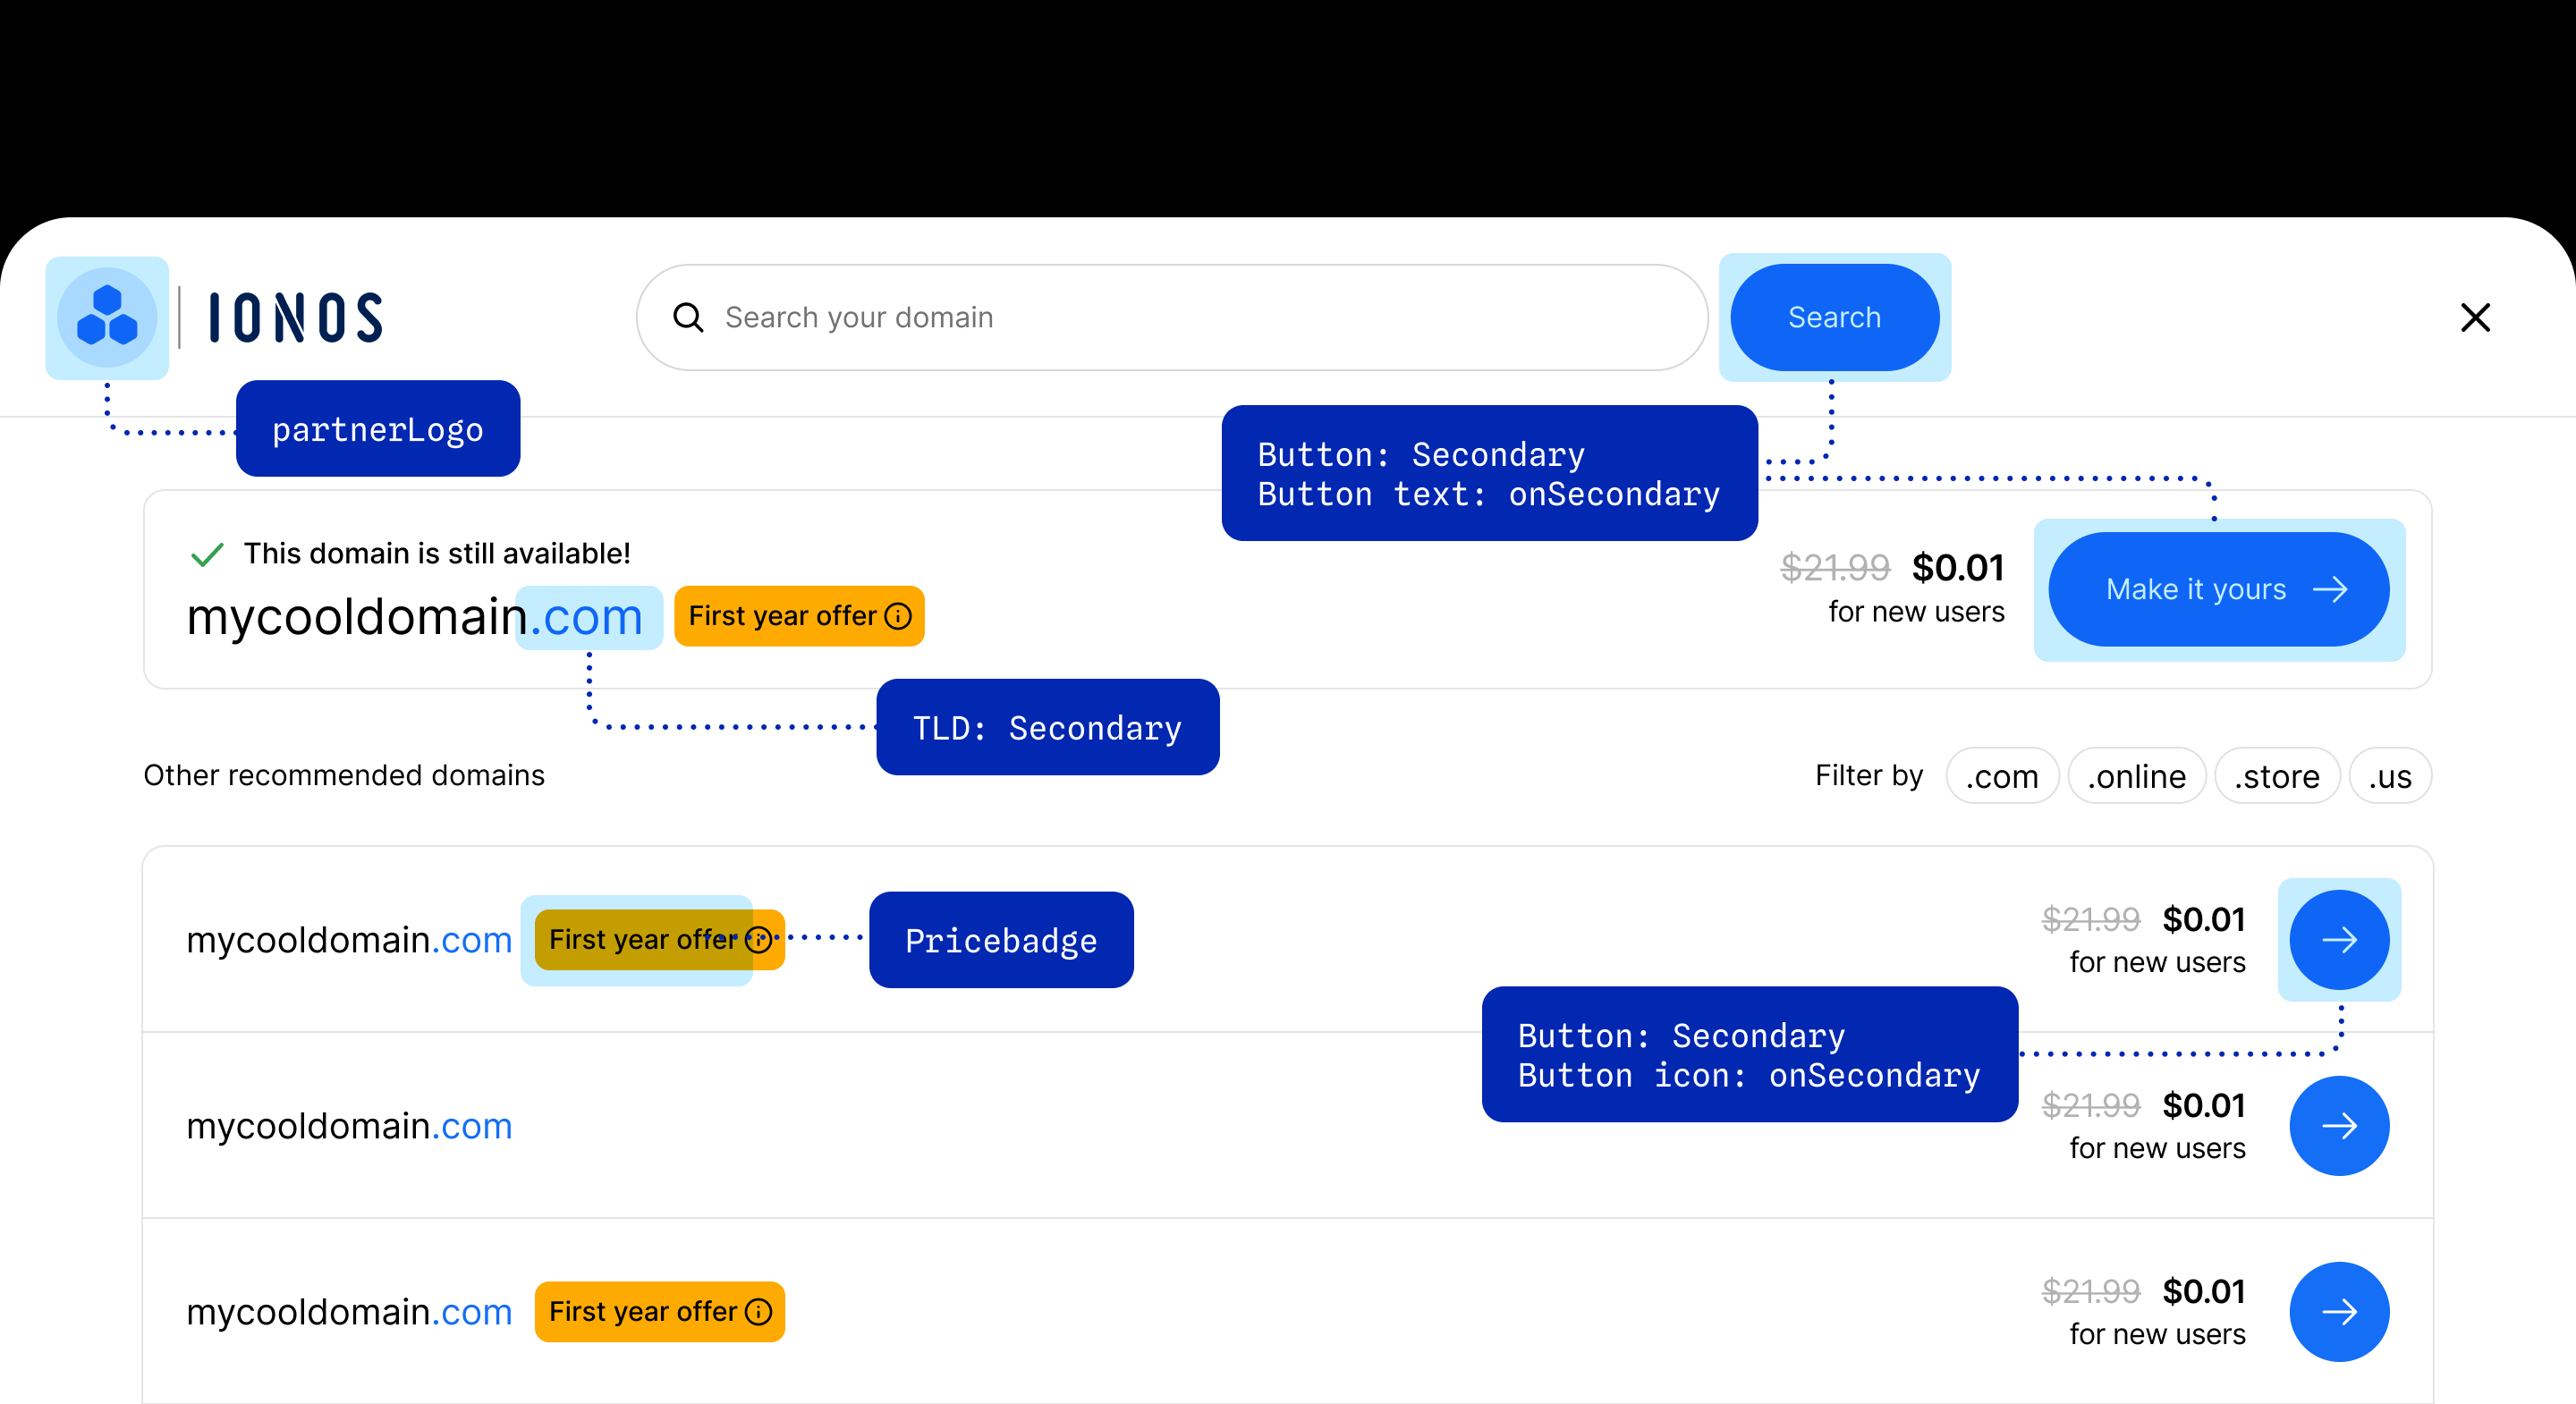
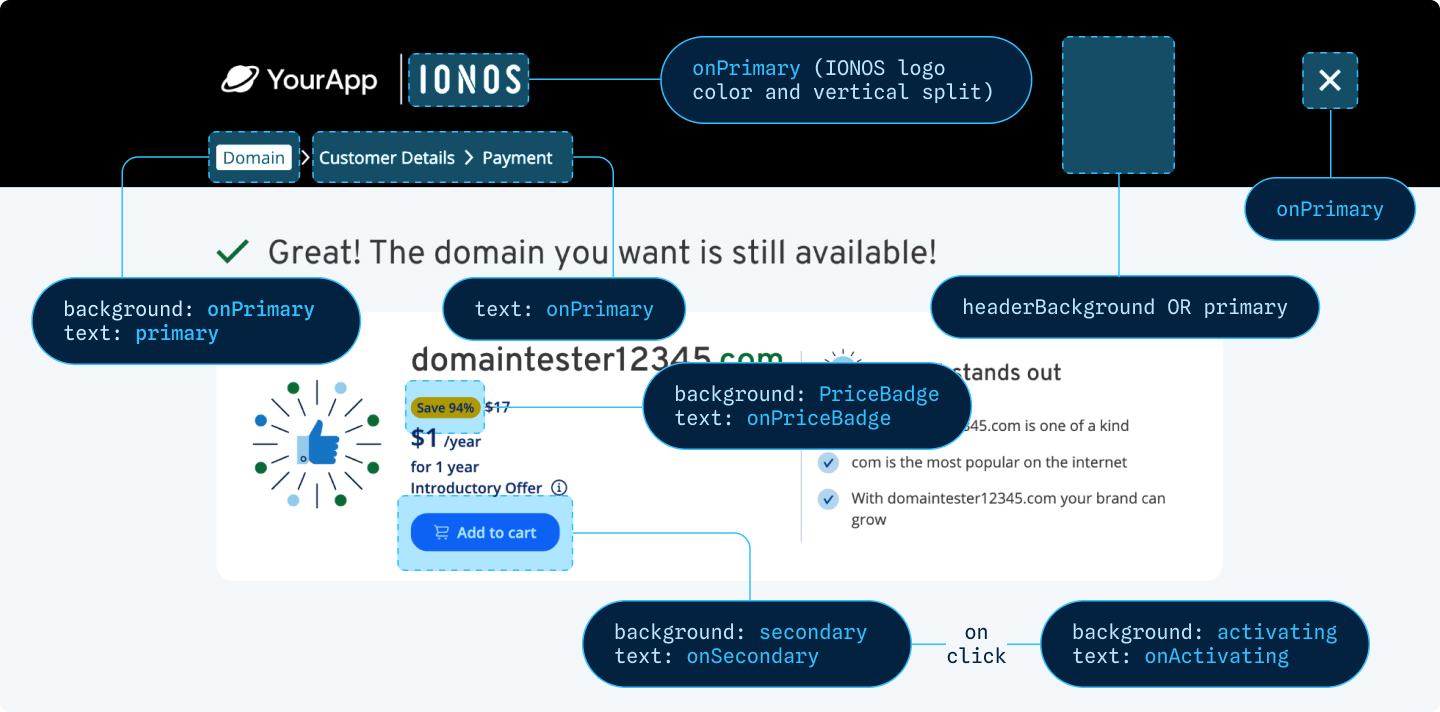
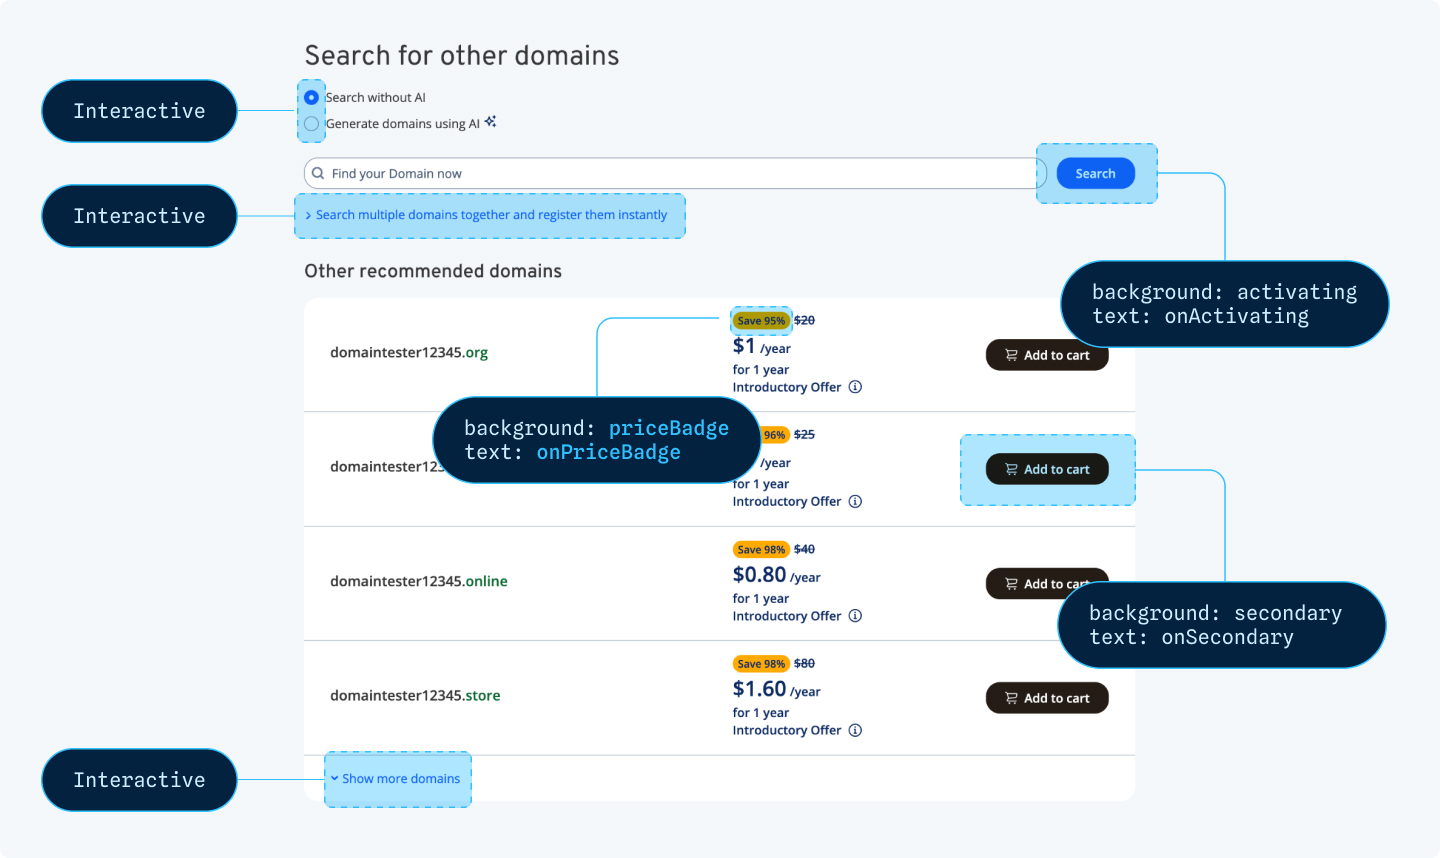
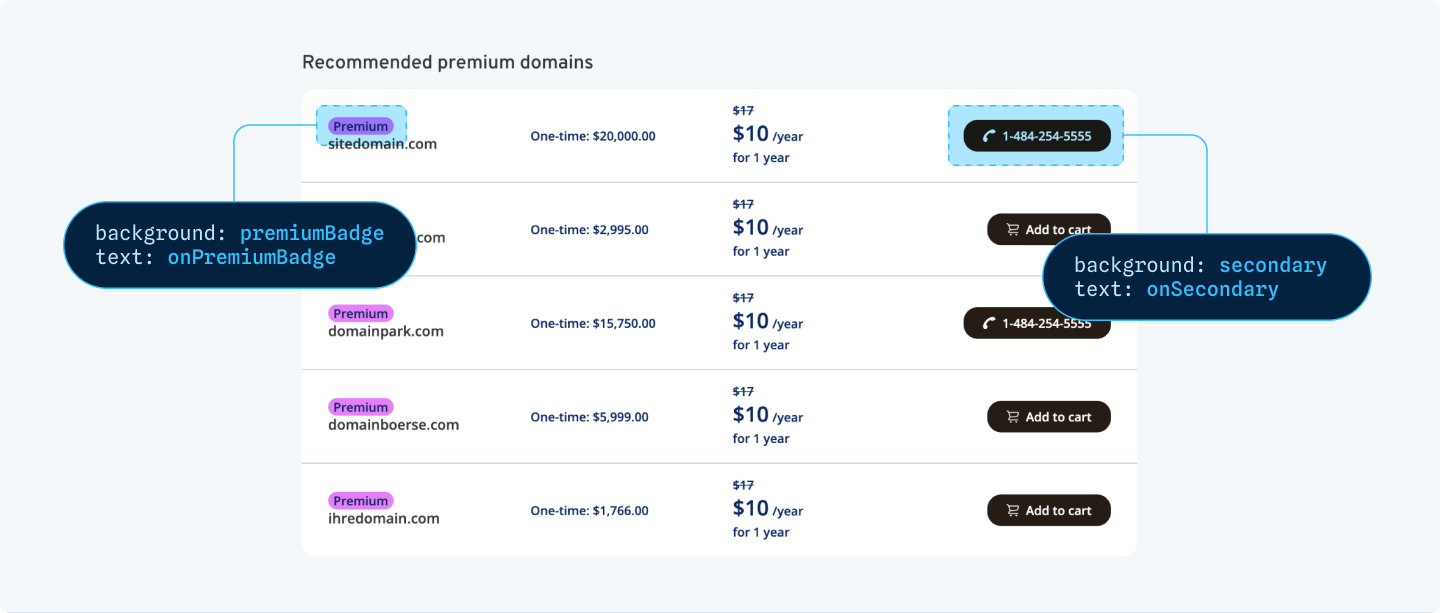
theme(object): Customizes the colors used in the purchase flow.primary(string): Main color used in your theme. It’s usually the most recognizable color in the interface. Example:"#012939"onPrimary(string): Color used for text and icons that appear on top of the primary color. Example:"#ffffff"secondary(string): Color that complements the primary color and is used for secondary UI elements. Example:"#012939"onSecondary(string): Color used for text and icons that appear on top of the secondary color. Example:"#ffffff"headerBackground(string) (optional): Background color of the header. Accepts any valid CSS color code (e.g., hex, rgb). If not defined, it will default to the primary color value. Example:"#123456"interactive(string) (optional): Color for interactive elements such as radio buttons. Accepts any valid CSS color code (e.g., hex, rgb). Example:"#ffcc00"premiumBadge(string) (optional): Background color of premium badge components. Accepts any valid CSS color code (e.g., hex, rgb). Example:"#00ffcc"onPremiumBadge(string) (optional): Text color on the premium badge. Accepts any valid CSS color code (e.g., hex, rgb). Example:"#ffffff"priceBadge(string) (optional):This field specifies the background color of the price badge component. Accepts any valid CSS color code (e.g., hex, rgb).Example:"#ff6600"onPriceBadge(string) (optional):This field specifies the text color on the price badge. Accepts any valid CSS color code (e.g., hex, rgb).Example:"#ffffff"activating(string) (optional): Background color of the “Search Domain” button. Accepts any valid CSS color code (e.g., hex, rgb). Example:"#ff4500"onActivating(string) (optional): Text color on the “Search Domain” button. Accepts any valid CSS color code (e.g., hex, rgb). Example:"#000000"
hideEntriLogo(boolean): Hide the Entri logo in the purchase flow. Example:truehideCompanyLogo(boolean): Hide the company logo in the purchase flow. Example:truehideCompanyName(boolean): Hide the company name in the purchase flow. Example:truecustomCopy(object): Custom text to be displayed in the purchase flow.initialScreen.title.{locale}(object): Title text that appears on the initial screen of the domain purchase flow, localized by language. Example:"Search for your domain"initialScreen.marketingCopy.{locale}(object): Marketing copy that appears below the domain input field, localized by language. Example:"Your website will look even better with a custom domain!"
Ionos Sell Object
whiteLabel.sell(object): Contains information specific to the cobranding and user data prefill in the domain purchase flow.flowTarget(string): The target location where the purchase flow window will be displayed. If _blank is specified, the flow will open in a new browser tab. Example:"_blank"overlayScreenHeight(string): The percentage of the viewport height allocated to the search domain screen overlay. Example:"80%"partnerLogo(string): The URL of the partner’s logo, which will be displayed prominently in the cobranded header. Example:"https://cdn.goentri.com/mylogo.svg"partnerIcon(string): The URL of the partner’s icon, which will appear in the floating cart at the bottom of the page. Example:"https://cdn.goentri.com/myicon.svg"partnerName(string): The name of the partner company, displayed within the purchase flow. Example:"My Company name"contact(object): Prefilled user data to be used in the contact information form during domain creation. The following fields are supported:firstName(string): User’s first name. Example:"John"lastName(string): User’s last name. Example:"Doe"email(string): User’s email address. Example:"john.doe@example.com"phone(string): User’s phone number. Example:"+1234567890"address(string): User’s street address. Example:"123 Main St"zip(string): User’s ZIP or postal code. Example:"12345"city(string): User’s city. Example:"Exampleville"state(string): User’s state or province. Example:"EX"postalCode(string): User’s postal code. Example:"12345"country(string): User’s country. Example:"US"
Other Settings
freeDomain(boolean): Indicates whether the domain price should be set to $0. Should only be used on paid users at the customer’s platform. Example:truelocale(string): The language/locale to be used in the domain purchase flow. Example:"en"
Advanced Security Settings for freeDomain
For additional security, you can explicitly set freeDomain:false or freeDomain:truewhen you create the JWT. This way, the user gets explicit authorization for running the free domain flow.If the client tries to use a config that doesn’t match the one hashed in the JWT, it will return an error. Here’s an example of how to use this when generating the JWT:
| Property | Type | Required | Default | Description |
|---|---|---|---|---|
freeDomain | boolean | No | N/A | When set to true, it will only allow Entri to run under the freeDomain flow. |
JavaScript
Mail Upsell
By default, Entri adds an extra step to the domain purchase flow. This step offers users the opportunity to purchase mail inboxes as an upsell. A mailbox is optional, meaning users can manually skip the mail offering if they are not interested..This property enhances the domain purchase experience by allowing you to promote additional services seamlessly, providing more value to users while keeping the flow non-intrusive.You can turn this feature off by setting thedisableMailUpsell:true in your configuration.
Example Configuration:
Squarespace
World class domain registration and a clean, easy-to-use interface. Squarespace Domains makes it easy.- 300+ TLDs to choose from.
- Award-winning support from Squarespace.
- Default domain privacy for added security.
- Instant DNS setup after purchase.
- Seamless connection to your website.
- Easy-to-use management dashboard.
Post purchase asynchronous DNS configurations
Entri offers the ability for you to perform DNS configuration updates after the Sell flow has taken place. To learn more about how this feature can be used, please refer to the Asynchronous DNS configurations section.Squarespace Sell Object
whiteLabel.sell(object): Contains information specific to the cobranding and user data prefill in the domain purchase flow.contact(object): Prefilled user data to be used in the contact information form during domain creation. The following fields are supported:firstName(string): User’s first name. Example:"John"lastName(string): User’s last name. Example:"Doe"email(string): User’s email address. Example:"john.doe@example.com"phone(string): User’s phone number. Example:"+1234567890"address(string): User’s street address. Example:"123 Main St"zip(string): User’s ZIP or postal code. Example:"12345"city(string): User’s city. Example:"Exampleville"state(string): User’s state or province. Example:"EX"postalCode(string): User’s postal code. Example:"12345"country(string): User’s country. Example:"US"